📌WordPress(동적인 웹서버, 블로그)
WordPress는 웹사이트를 쉽게 만들고 관리할 수 있는 콘텐츠 관리 시스템(CMS, Content Management System) 임
PHP로 개발되었고, MySQL 또는 MariaDB 데이터베이스를 사용, 요청에 대한 결과물이 변동되는 서버
🛠 WordPress 주요 특징
✅ 사용자 친화적 – 코딩 없이 웹사이트를 만들고 관리 가능
✅ 플러그인 지원 – 다양한 기능 추가 가능 (예: SEO, 보안, 결제 시스템)
- WordPress나 다른 소프트웨어에서 추가 기능을 쉽게 확장할 수 있도록 해주는 작은 프로그램
✅ 테마 지원 – 원하는 디자인으로 쉽게 변경 가능
✅ 블로그 & 웹사이트 제작 가능 – 기업 웹사이트, 쇼핑몰, 포트폴리오 등 활용 가능
✅ 오픈소스 & 무료 – 누구나 사용 가능 (추가 기능은 유료)
HTTPD(Apache), PHP, MariaDB의 연관성
- 웹 서버 + 백엔드 로직 + 데이터베이스로 웹사이트를 운영하는 데 필수적인 요소
- 보통 LAMP 스택(Linux, Apache, MySQL/MariaDB, PHP)의 일부로 사용돼.
HTTPD(Apache)
- 클라이언트(웹 브라우저)에서 보낸 HTTP 요청을 처리하고 웹 페이지(HTML, PHP)를 응답으로 제공함.
- 사용자가 http://example.com에 접속하면, Apache(httpd)가 요청을 받아서 index.php 같은 파일을 실행함.
PHP
- 동적인 웹 페이지를 생성하는 역할
- Apache는 정적인 HTML 파일뿐만 아니라 PHP 파일도 제공할 수 있는데, PHP 엔진을 통해. php 파일을 실행시켜야 함.
- Apache가 PHP 인터프리터를 호출하여 실행한 뒤 결과를 HTML로 변환하여 클라이언트에 반환함.
MariaDB
- 관계형 데이터베이스(relational database, 테이블 = 표)
실습
yum install -y mariadb-server
- 데몬 설치
systemctl restart mariadb
systemctl enable mariadb


- mysql서버에 접속(root 사용자)
- localhost에 존재하는 DB서버에 접속
[root@db-1 ~]# mysql_secure_installation

NOTE: RUNNING ALL PARTS OF THIS SCRIPT IS RECOMMENDED FOR ALL MariaDB
      SERVERS IN PRODUCTION USE!  PLEASE READ EACH STEP CAREFULLY!

In order to log into MariaDB to secure it, we'll need the current
password for the root user.  If you've just installed MariaDB, and
you haven't set the root password yet, the password will be blank,
so you should just press enter here.

Enter current password for root (enter for none): #test123
OK, successfully used password, moving on...

Setting the root password ensures that nobody can log into the MariaDB
root user without the proper authorisation.

Set root password? [Y/n] Y
New password:
Re-enter new password:
Password updated successfully!
Reloading privilege tables..
 ... Success!


By default, a MariaDB installation has an anonymous user, allowing anyone
to log into MariaDB without having to have a user account created for
them.  This is intended only for testing, and to make the installation
go a bit smoother.  You should remove them before moving into a
production environment.

Remove anonymous users? [Y/n] ^C # root비번이랑 겹치니까 걍 나가주고
Aborting!

Cleaning up...
[root@db-1 ~]# mysql_secure_installation #다시 재설정

NOTE: RUNNING ALL PARTS OF THIS SCRIPT IS RECOMMENDED FOR ALL MariaDB
      SERVERS IN PRODUCTION USE!  PLEASE READ EACH STEP CAREFULLY!

In order to log into MariaDB to secure it, we'll need the current
password for the root user.  If you've just installed MariaDB, and
you haven't set the root password yet, the password will be blank,
so you should just press enter here.

Enter current password for root (enter for none): (enter)
OK, successfully used password, moving on...

Setting the root password ensures that nobody can log into the MariaDB
root user without the proper authorisation.

You already have a root password set, so you can safely answer 'n'.

Change the root password? [Y/n] Y
New password: #1234
Re-enter new password: #1234
Password updated successfully!
Reloading privilege tables..
 ... Success!


By default, a MariaDB installation has an anonymous user, allowing anyone
to log into MariaDB without having to have a user account created for
them.  This is intended only for testing, and to make the installation
go a bit smoother.  You should remove them before moving into a
production environment.

Remove anonymous users? [Y/n] Y #기존 사용자 삭제하실?
 ... Success!

Normally, root should only be allowed to connect from 'localhost'.  This
ensures that someone cannot guess at the root password from the network.

Disallow root login remotely? [Y/n] Y #외부에서 root접속 허용할래?
 ... Success!

By default, MariaDB comes with a database named 'test' that anyone can
access.  This is also intended only for testing, and should be removed
before moving into a production environment.

Remove test database and access to it? [Y/n] Y #테스트 데이터베이스 삭제할래?
 - Dropping test database...
 ... Success!
 - Removing privileges on test database...
 ... Success!

Reloading the privilege tables will ensure that all changes made so far
will take effect immediately.

Reload privilege tables now? [Y/n] Y
 ... Success!
[root@db-1 ~]# mysql -u root -p1234
mysql -u 사용자 root -p1234 암호를 꼭 붙여서 쓰세요


- 데이터베이스 하나 추가 wp_DB
create database wp_DB 이름
grant all privileges on wp_DB.* to wpuser@'%' identified by '1234';
- grant 부여 all 모든 권한을 privileges on wp_DB.* 모든 테이블 이름 to wpuser@ 사용자 생성과 동시에 권한을 부여 '%' 어떤 IP에서도(%) 접속 가능 identified by 암호 '1234' 내가 설정한 암호;
- 다른 모든 서버에서 wpuser라는 사용자와 1234라는 암호로 접근 시 wp_DB라는 이름을 갖는 DB에 대한 모든 권한을 부여함


- 내가 접근 가능한 DB이름이 보임
DB이름 : wp_DB
DB주소 : 211.183.3.33
DB사용자 : wpuser
DB암호 : wpuser라는 사용자에 대한 암호, 1234
- DB서버에 접근하기 위해서는 보통 이렇게 4가지 정보가 필요함(+포트)
WORDPRESS 설치
yum install -y epel-release
- centosd의 대용량 업데이트
yum -y install https://rpms.remirepo.net/enterprise/remi-release-7.rpm
yum install -y yum-utils
- 다운로드한 레포지토리 목록에 대한 정보를 반영시키기 위해 설치하는 yum추가 명령어 패키지
- yum-config-manager라는 명령을 쓸 수 있음.
yum-config-manager --enable remi-php73
- 아까 활성화한 레미 레포의 php7.3 버전 정보를 등록
yum install -y php
- php 다운로드. 워드프레스의 개발환경. 워드프레스는 반드시 7 버전이상의 php가 필요함
php -v
- 버전 확인 할 수 있음
- 제대로 했다면 7.3 버전이 설치됐을 것
[root@db ~]# yum install -y php-mysql
# 모든 백엔드 언어(php, java, python 등등..)들은 db에 접근하기 위한 커넥터가 필요하다.
오류/ 해결방안

- kill -9 12021. 해당 프로세스가 yum을 점유하고 있어서(작업이 안 끝남, 오류) 해당 프로세스를 죽여줘야 함.
yum install -y wget unzip
- wordpress 다운로드하고 압축풀 패키지 설치
wget https://wordpress.org/latest.zip
- 최선버전의 wordpress 설치
unzip latest.zip -d /var/www/html
- 웹루트디렉터리에 압축 해제.

- 이모티콘이 귀여워서
- html이 구성된 웹페이지? 생김
- wp-config.php가 설정에 관련된 파일. 우리는 주로 db와 연동시키는 부분만 수정할 예정.
[root@db wordpress]# mv wp-config-sample.php wp-config.php
[root@db wordpress]# vi wp-config.php
define( 'DB_NAME', 'database_name_here' ); #DB이름

/** Database username */
define( 'DB_USER', 'username_here' ); #DB에 설정한 유저 이름

/** Database password */
define( 'DB_PASSWORD', 'password_here' );#DB에 설정한 유저 비번

/** Database hostname */
define( 'DB_HOST', 'localhost' ); #DB로컬 호스트/ 그냥 localhost도 가능
수정 버전
define( 'DB_NAME', 'wp_DB' );

/** Database username */
define( 'DB_USER', 'wpuser' );

/** Database password */
define( 'DB_PASSWORD', '1234' );

/** Database hostname */
define( 'DB_HOST', '211.183.3.33' );
[root@db wordpress]# systemctl restart httpd
웹브라우저에서 http://211.183.3.33/wordpress 접속


- 작업할 DB선택

- 다양한 테이블이 존재하는 걸 볼 수 있음
- 다양한 테이블을 wordpress라는 블로그 프로그램이 php로 생성
MariaDB [wp_DB]> select * from wp_comments;

- wp_comments라는 테이블의 모든(*) 정보를 조회(select)하고 싶음
MariaDB [wp_DB]> select comment_content from wp_comments;

- comment_content만 보여
- 게시물에 댓글을 남겼다면 댓글도 보임
- php를 통해 db에 정보가 저장이 됐구나. 정도를 이해하면 됨
실습 1
<워드프레스 서버>
hostname : hwwp
IP : 211.183.3.180
<DB서버>
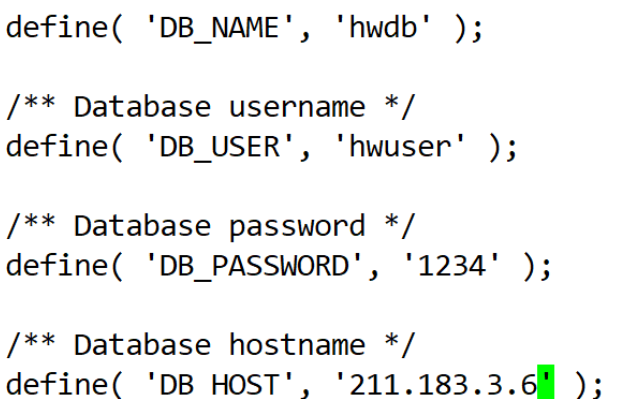
hostname : hwdb
IP : 211.183.3.6
DB : hwdb
DB사용자 : hwuser
hwuser암호 : 1234
문제 풀이
초기세팅
systemctl stop firewalld && systemctl disable firewalld && sed -i s/SELINUX=enforcing/SELINUX=disabled/g /etc/selinux/config && sed -i s/mirror.centos.org/vault.centos.org/g /etc/yum.repos.d/*.repo && sed -i s/mirrorlist=http/#mirrorlist=http/g /etc/yum.repos.d/*.repo && sed -i s/^#.*baseurl=http/baseurl=http/g /etc/yum.repos.d/*.repo && yum clean all && init 6
<DB서버>
mariadb-server 설치 후, mysql_secure_installation 후
[root@db ~]# mysql -u root -p1234
MariaDB [(none)]> create database hwdb;
MariaDB [(none)]> grant all privileges on hwdb.* to hwuser@'%' identified by '1234';
[root@db ~]# mysql -u hwuser -p1234 -h 211.183.3.6
<워드프레스 서버>
[root@db ~]# yum install -y epel-release
[root@db ~]# yum -y install https://rpms.remirepo.net/enterprise/remi-release-7.rpm
[root@db ~]# yum install -y yum-utils
[root@db ~]# yum-config-manager --enable remi-php73
[root@db ~]# yum install -y php
[root@db ~]# yum install -y php-mysql
[root@db ~]# yum install -y wget unzip
[root@db ~]# wget https://wordpress.org/latest.zip
[root@db ~]# unzip latest.zip -d /var/www/html
[root@db wordpress]# mv wp-config-sample.php wp-config.php
[root@db wordpress]# vi wp-config.php
[root@db wordpress]# systemctl restart httpd
comment 확인
DB서버에 가서
[root@db wordpress]# mysql -u wpuser -p1234
use hwuser;
show tables;
#확인
elect comment_content from wp_comments;
'AWS Cloud School 8기 > 서버가상화_클라우드 이미지' 카테고리의 다른 글
| LVM (0) | 2025.01.31 |
|---|---|
| 디스크 관리, RAID (2) | 2025.01.27 |
| 방어벽/ 포트의 개념 (0) | 2025.01.26 |
| PxE kickstart/ 응용 실습 (0) | 2025.01.26 |
| FTP(신뢰성 y 파일 전송 y),DHCP(IP부여) ,TFTP(신뢰성 n 파일 전송 y), PxE(OS 설치 환경 -> 네트워크 -> 제공) 응용 문제/ 이론 (5) | 2025.01.24 |


