실습 문제

외부 통신에 필요한 정보(디폴트루트, IP)를 받아올 수 있음. DNS, DB, WP의 각각의 서버를 만들어서 서로의 정보를 공유하도록 구성해야 됨
결론적으로 영문주소로 접속해야 하고, 최종적으로 제3의 노트북은 WP의 IP에 브라우저로 접속했을 때 wordpress 화면이 보여야 됨
실습 풀이
✅GNS3 설정
DNS -> DB -> WP 순으로 진행해야 됨
R1(config-if)#int f0/0
R1(config-if)#ip add 10.10.1.50 255.255.255.0
R1(config-if)#no sh
R1(config-if)#in nat in
R1(config-if)#int f0/1
R1(config-if)#ip add 10.10.2.55 255.255.255.0
R1(config-if)#no sh
R1(config-if)#in nat in
R1(config-if)#int f1/0
R1(config-if)#ip add 10.10.3.75 255.255.255.0
R1(config-if)#no sh
R1(config-if)#in nat in
R1(config-if)#int f2/0
R1(config-if)#ip add 10.10.3.100 255.255.255.0
R1(config-if)#no sh
R1(config-if)#in nat out
R1(config-if)#ip route 0.0.0.0 0.0.0.0 211.183.3.2
✅ xshell 초기 설정
VM 대역과 IP 그리고 GW가 맞도록 잘 만들어주고
초기 설정
sed -i s/SELINUX=enforcing/SELINUX=disabled/g /etc/selinux/config
reboot
systemctl stop firewalld
systemctl disable firewalld
cat <<EOF> /etc/yum.repos.d/CentOS-Base.repo
[base]
name=CentOS-$releasever - Base
#mirrorlist=http://mirrorlist.centos.org/?release=$releasever&arch=$basearch&repo=os&infra=$infra
baseurl=https://vault.centos.org/7.9.2009/os/x86_64/
gpgcheck=1
gpgkey=file:///etc/pki/rpm-gpg/RPM-GPG-KEY-CentOS-7
#released updates
[updates]
name=CentOS-$releasever - Updates
#mirrorlist=http://mirrorlist.centos.org/?release=$releasever&arch=$basearch&repo=updates&infra=$infra
baseurl=https://vault.centos.org/7.9.2009/updates/x86_64/
gpgcheck=1
gpgkey=file:///etc/pki/rpm-gpg/RPM-GPG-KEY-CentOS-7
#additional packages that may be useful
[extras]
name=CentOS-$releasever - Extras
#mirrorlist=http://mirrorlist.centos.org/?release=$releasever&arch=$basearch&repo=extras&infra=$infra
baseurl=https://vault.centos.org/7.9.2009/extras/x86_64/
gpgcheck=1
gpgkey=file:///etc/pki/rpm-gpg/RPM-GPG-KEY-CentOS-7
#additional packages that extend functionality of existing packages
[centosplus]
name=CentOS-$releasever - Plus
#mirrorlist=http://mirrorlist.centos.org/?release=$releasever&arch=$basearch&repo=centosplus&infra=$infra
baseurl=https://vault.centos.org/7.9.2009/centosplus/x86_64/
gpgcheck=1
enabled=0
gpgkey=file:///etc/pki/rpm-gpg/RPM-GPG-KEY-CentOS-7
#contrib - packages by Centos Users
[contrib]
name=CentOS-$releasever - Contrib
#mirrorlist=http://mirrorlist.centos.org/?release=$releasever&arch=$basearch&repo=contrib&infra=$infra
baseurl=https://vault.centos.org/7.9.2009/contrib/x86_64/
gpgcheck=1
enabled=0
gpgkey=file:///etc/pki/rpm-gpg/RPM-GPG-KEY-CentOS-7
> EOF
✅ DNS
DNS/ 호스트네임 변경하는 방법
DNS(Domain Name System)- 도메인 이름을 IP주소로 변환해 주는 시스템임- 우리가 www.google.com 같은 도메인을 입력하면, DNS가 알아서 "8.8.8.8" 같은 IP 주소로 변환해서 서버에 연결해 줌 - 통신을 한다는
yunz-story.tistory.com
- 참고
[root@dns-dns ~]# yum install -y bind bind-utils
[root@dns-dns ~]# vi /etc/named.conf
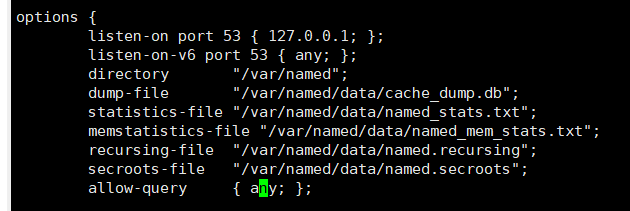
[root@dns-dns ~]# vi /etc/named.rfc1912.zones

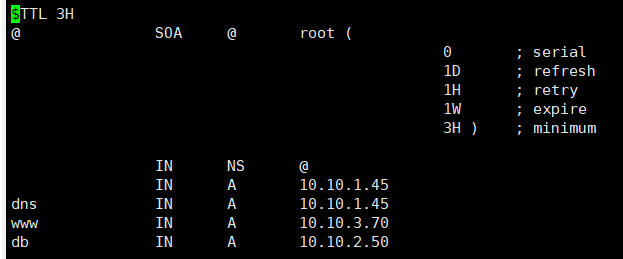
[root@dns-dns ~]# vi /var/named/chillguy.com.db
[root@dns-dns ~]# systemctl restart named
[root@dns-dns ~]# systemctl enable named
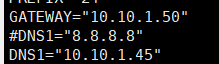
[root@dns-dns ~]# vi /etc/sysconfig/network-scripts/ifcfg-ens32
[root@dns-dns ~]# systemctl restart network
[root@dns-dns ~]# cat /etc/resolv.conf

✅ DB
https://yunz-story.tistory.com/entry/WordPress
WordPress
📌WordPress(동적인 웹서버, 블로그)WordPress는 웹사이트를 쉽게 만들고 관리할 수 있는 콘텐츠 관리 시스템(CMS, Content Management System) 임PHP로 개발되었고, MySQL 또는 MariaDB 데이터베이스를 사용, 요청
yunz-story.tistory.com
- 참고
yum install -y mariadb-server
systemctl restart mariadb
systemctl enable mariadb
mysql_secure_installation
NOTE: RUNNING ALL PARTS OF THIS SCRIPT IS RECOMMENDED FOR ALL MariaDB
SERVERS IN PRODUCTION USE! PLEASE READ EACH STEP CAREFULLY!
In order to log into MariaDB to secure it, we'll need the current
password for the root user. If you've just installed MariaDB, and
you haven't set the root password yet, the password will be blank,
so you should just press enter here.
Enter current password for root (enter for none): #(enter)
OK, successfully used password, moving on...
Setting the root password ensures that nobody can log into the MariaDB
root user without the proper authorisation.
Set root password? [Y/n] Y
New password: #1234
Re-enter new password: #1234
Password updated successfully!
Reloading privilege tables..
... Success!
By default, a MariaDB installation has an anonymous user, allowing anyone
to log into MariaDB without having to have a user account created for
them. This is intended only for testing, and to make the installation
go a bit smoother. You should remove them before moving into a
production environment.
Remove anonymous users? [Y/n] Y
... Success!
Normally, root should only be allowed to connect from 'localhost'. This
ensures that someone cannot guess at the root password from the network.
Disallow root login remotely? [Y/n] Y
... Success!
By default, MariaDB comes with a database named 'test' that anyone can
access. This is also intended only for testing, and should be removed
before moving into a production environment.
Remove test database and access to it? [Y/n] Y
- Dropping test database...
... Success!
- Removing privileges on test database...
... Success!
Reloading the privilege tables will ensure that all changes made so far
will take effect immediately.
Reload privilege tables now? [Y/n] Y
... Success!
Cleaning up...
All done! If you've completed all of the above steps, your MariaDB
installation should now be secure.
mysql -u root -p1234
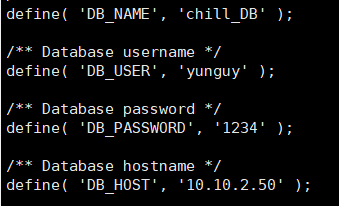
MariaDB [(none)]> create database chill_DB;
MariaDB [(none)]> show databases;

MariaDB [(none)]> grant all privileges on chill_DB.* to yunguy@'%' identified by '1234';
✅ WP
yum install -y epel-release
yum -y install https://rpms.remirepo.net/enterprise/remi-release-7.rpm
(이상하게 내가 복붙 한 건 설치가 안되고 강사님이 올려준 파일을 복붙 해야 다운이 됨...)
yum install -y yum-utils
yum-config-manager --enable remi-php73
yum install -y php
php -v
yum install -y php-mysql
yum install -y wget unzip
wget https://wordpress.org/latest.zip
(얘도 마찬가지...)
unzip latest.zip -d /var/www/html
cd /var/www/html/wordpress
mv wp-config-sample.php wp-config.php
vi wp-config.php
systemctl restart httpd
http://10.10.1.45/wordpress
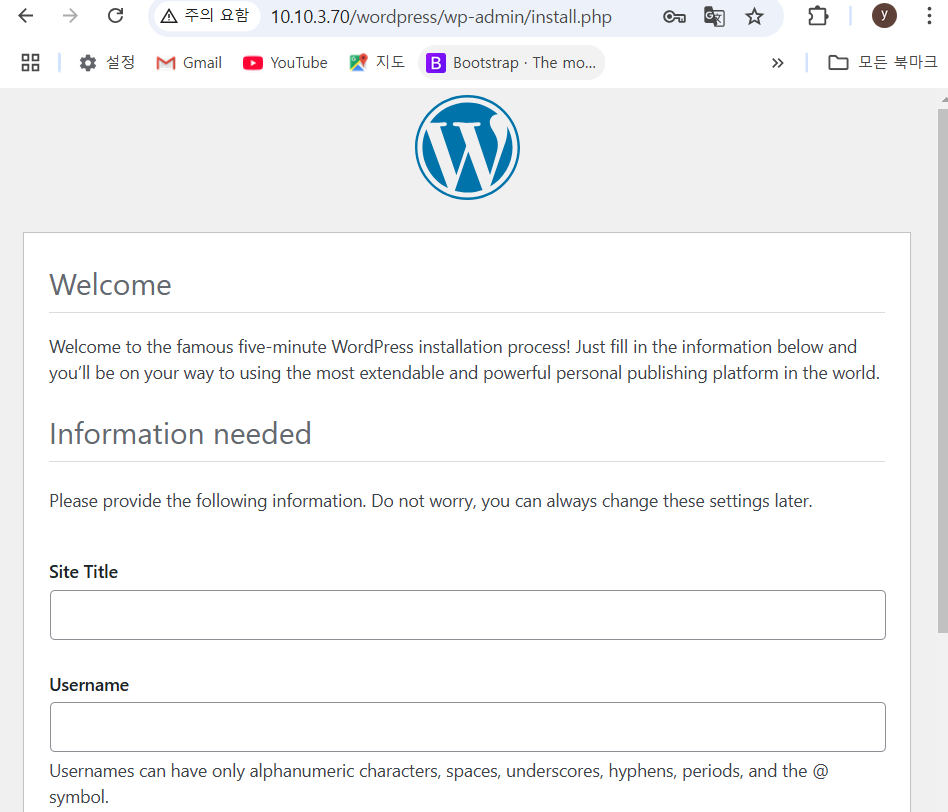
good!
하지만 강사님께서 의도한 문제를 맞추지 못함 ㅜㅜ
R1, R2, R3의 f0/0이 같은 대역에 있게 구현해야 됨
<강사님께서 의도한 문제 풀이 방식>
1. 라우터의 맥주소를 변경한 이유? -> 4자리씩 나눈 것
GNS3를 통해서 와이파이를 통해 브리지로 부여받기 위해서 쓴 꼼수. 맥주소라는 건 되도록이면 임의로 변경 안 하는 게 좋고, 변경하더라도 겹치지 않게 변경해야함. vmnet8 에서 자율과제를 하셨을때는 맥주소를 변경 안하는게 맞습니다.
2. 이 실습의 목적은 서로 다른 네트워크를 갖고 있을 때 통신을 하고 싶으면 어떻게 해야 할지? => 노트북이 같은 네트워크에 있었으면 좋겠다. 노트북 내부에는 서로 다른 대역을 갖고 있고, 그 대역에 있는 VM끼리 서로 통신을 했으면 하는 게 나의 ‘바람’이기 때문임
3. 팀실습을 할 때는 어차피 내부의 네트워크를 어떻게 가져가는지가 중요하지 않음 ( 3명 다 vmnet1을 써도 무방, 왜냐하면 타인입장에서 내부의 사정은 중요하지 않기 때문임. = 어차피 NAT가 발생을 하고 브리지대역에서만 서로 통신 잘되면 됨)
다만, 자율과제를 혼자서 할 때는 내부의 네트워크를 서로 다르게 가져가야 함 (vmnet1, vmnet2, vmnet3)

# 팀실습 과제를 할 때, vmnet8은 안 되는 이유.
vmnet8에서는 영수, 옥순이 갖고 있는 서버 A와 서버 B가 서로 통신이 불가능함.

vmnet은 dhcp서버가 꺼져있기 때문에 virtual network editor 가서 dhcp를 활성해서 받아도 좋고,
수동으로 입력하는 게 제일 쉽고 빠르긴 함. 다만, Bridge에서는 왜 dhcp로 했나?
-> IP충돌을 방지를 위한 목적, 수동으로 입력하면 서로 겹치는 위험이 있음.

2. 혼자서 브리지 대역을 쓴다면 어떻게 구성하면 좋을지 생각해 보고 한번 해보세요!
- VM을 3개 만들어서 전부 브리지대역에 두는 수밖에 없음.
- 위 문제에서 ‘내부’라는 단서만 없었다면 이렇게 해도 상관은 없었다.
-> vmnet8 DHCP Service
-> 정적 IP
-> vmnet8 DHCP Server
'AWS Cloud School 8기 > 서버가상화_클라우드 이미지' 카테고리의 다른 글
| 3-Tier Architecture (3계층 아키텍처)/ Reverse Proxy (리버스 프록시) (0) | 2025.02.06 |
|---|---|
| Proxy[정방향 프록시 (Forward Proxy)], SSH (1) | 2025.02.05 |
| WordPress (2) | 2025.01.31 |
| LVM (1) | 2025.01.31 |
| 디스크 관리, RAID (5) | 2025.01.27 |


